Setting up Algo VPN in Oracle cloud
Using VPN abroad sometimes has advantages but paying a VPN service subscription could cost more than it worth.
However, what if you already have a VPS aboard? There seems to be a free VPS hosting nowadays.
As I told in the previous post, I tried to set Algo VPN server in Oracle Cloud.
Hope this dump to help you.
Disclaimer
Please use your VPN server in your own responsibility. I am not responsible any of the consequences of using Oracle Cloud or VPN.
Create an instance
- Check Oracle Cloud and Sign up.
- Choose your home region where you intend to be.
- Sign into the web console and click
Create a VM instance.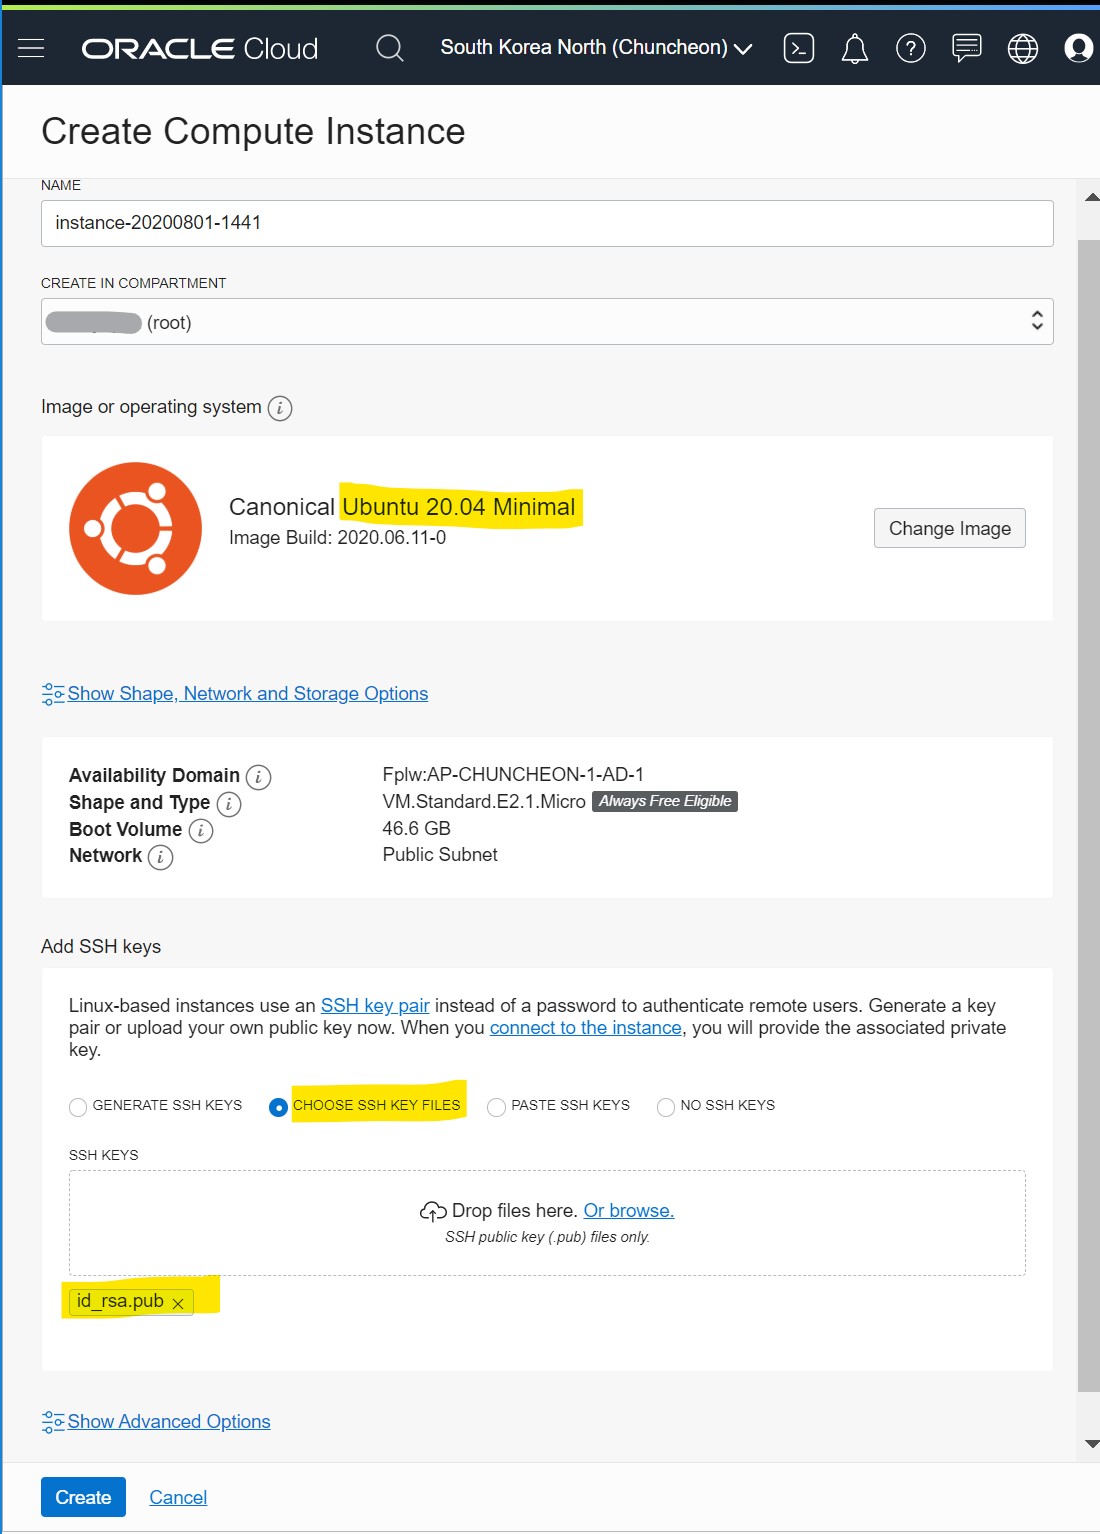
- Choose ubuntu minimal and upload your public key
- Check how to create ssh key if you don’t have one.
- Choose ubuntu minimal and upload your public key
- Click create and you will see above details.
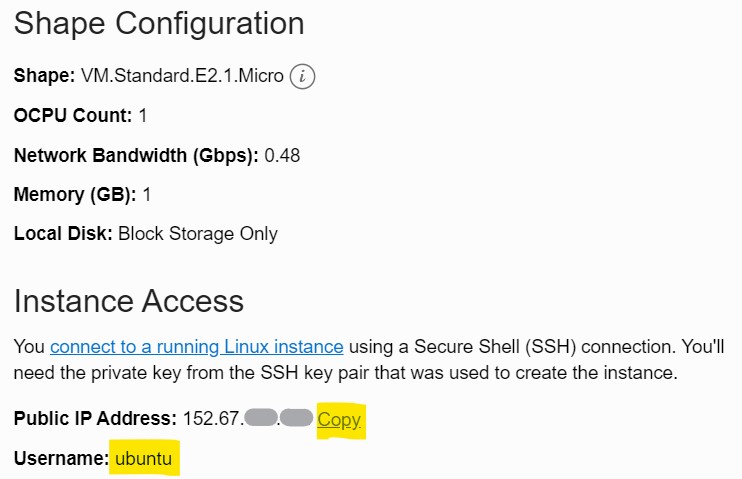
- Memo the public IP.
Now You can connect into the instance using ssh client.
Install Algo VPN server
Connect to the instance created above and follow the following instructions to install the VPN server.
Apt upgrade and install dependencies
$ sudo apt update && sudo apt upgrade -y
$ sudo apt install -y python3-virtualenv unzip vim
Install your editor as well above like vim or nano.
Download Algo
$ wget https://github.com/trailofbits/algo/archive/master.zip
$ unzip master.zip
Set virtualenv
$ cd algo-master
$ python3 -m virtualenv --python="$(command -v python3)" .env &&
  source .env/bin/activate &&
  python3 -m pip install -U pip virtualenv &&
  python3 -m pip install -r requirements.txt
Config users
Edit config.cfg to add users
$ vi config.cfg
I recommend you to use like the following since sharing accounts is told to cause some issues
users:
  - phone
  - phone2
  - tablet
  - tablet2
  - laptop
  - laptop2
  - desktop
  - desktop2
  - server
  - server2
  - guest
  - guest2
Start deployment
It’s an interactive script. You need to choose options and the script will get the job done.
$ ./algo
The first question is the most important Put 11 since you are using the localhost which you are using for the installation
[Cloud prompt]
What provider would you like to use?
--> 11. Install to existing Ubuntu 18.04 or 20.04 server (for more advanced users)
Most of the following would be okay for their default (just enter) but you will need the followings two answered differently
[Retain the PKI prompt]
Do you want to retain the keys (PKI)? (required to add users in the future, but less secure)
[y/N]
--> Y
[local : pause]
Enter the public IP address or domain name of your server: (IMPORTANT! This is used to verify the certificate)
[localhost]

---> [Put the public IP adress of your instance]
And it will start to install the VPN server and then it show the server details.
'#                       Congratulations!                         #'
'#                  Your Algo server is running.                  #'
'# Config files and certificates are in the ./configs/ directory. #'
'#           Go to https://whoer.net/ after connecting            #'
'#     and ensure that all your traffic passes through the VPN.   #'
'#                  Local DNS resolver 172.29.**.**               #'
'#     The p12 and SSH keys password for new users is *********   #'
'#     The CA key password is ****************                    #'
If something went wrong, it’s recommended to restart the whole procedure from the top. Terminate the instance and recreate the instance.
Copy credentials from the Algo server
Now it’s okay to disconnect the ssh connection to the VPN server.
From your local env (eg. laptop), run scp to copy files from the server
Replace vpnserver to your VPN server IP.
$ scp -r ubuntu@vpnserver:algo-master/configs .
Now you can use credentials for the VPN server in the configs directory.
Open the ports for the VPN
VPN server itself is ready now but there is still one more step left. The ports are usually closed so it should be allowed manually.
Add Security List for VPN
Sign into the web console.
- Go to Networking > Virtual Cloud Networks
- Click the VCN name in the right plan to see the details
- Click the Security Lists in the Resources in the Left pane
- Click
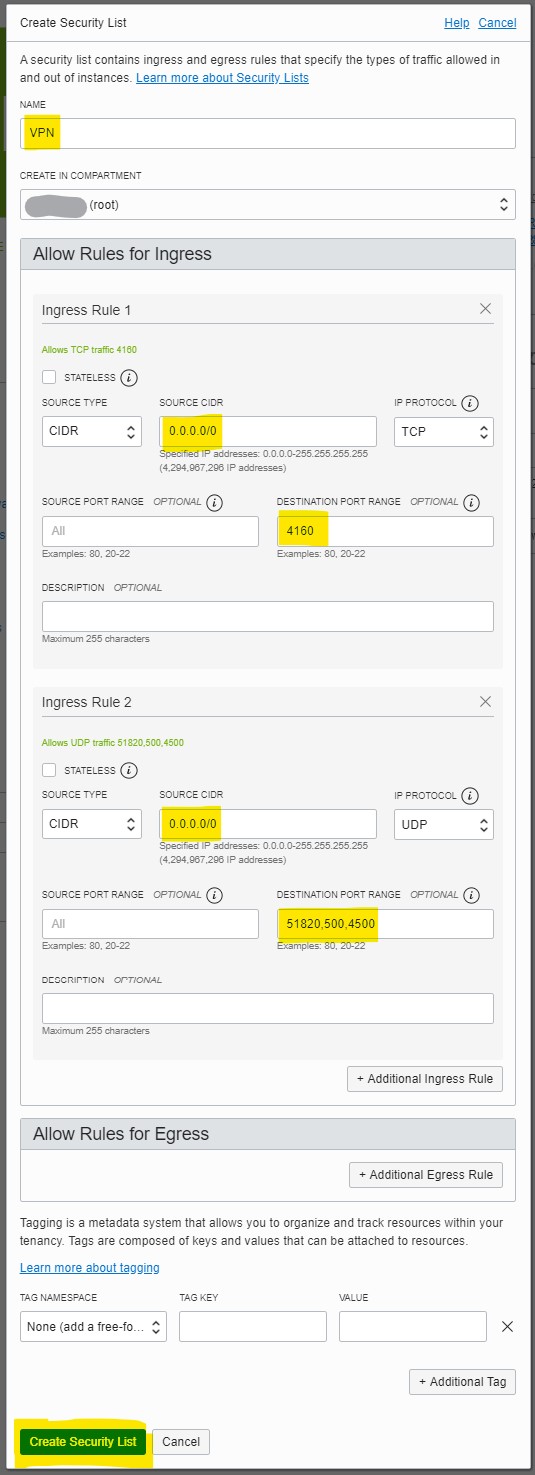
Create Security List - Put details in the popup
- Name: VPN
- Additional Ingress Rule: Ingress Rule 1
- Source CIDR: 0.0.0.0/0
- Destination Port Range: 4160
- Additional Ingress Rule: Ingress Rule 2
- Source CIDR: 0.0.0.0/0
- IP Protocol: UDP
- Destination Port Range: 51820,500,4500
- Click
Create Security Listto confirm
Bind the Security List to the Public Subnet
- Go to the Instace Details (Compute > Instaces > Instance Details)
- Click
Subnetof Primary VNIC - Click
Add Security List - Select the
VPNin the security list pull down in the popup - Click
Add Security Listto confirm
Client settings
Let me share how I connect my iPad
- Get the WireGuard in Appstore. (iOS12 or higher is required)
- Open the PNG QR code file of the user such as
configs/localhost/wireguard/tablet.pngconfigsdirectory is the one you copied in the previous step - Launch WireGuard and touch
+button to Create from QR code - Take the QR code and name it like
tablet - turn on the connection
That’s it.
Go to the browser and search for my ip to confirm your ip is of the one of the VPN server.
WireGuard app is available for Mac and Windows10 as well so you can do similar
Troubleshooting
When the server is not available, WireGuard app silently fails so network is not available.
Turn off the connection switch in the WireGuard and resolve the server issue and retry.